
The Ultimate Guide to Creating Your Own Stylish Embroidery Jewelry Organizer
Do you want to avoid untangling necklaces, searching for missing earrings, and dealing with a cluttered jewelry drawer? Say goodbye to the chaos and hello to an organization with your very own stylish embroidery jewelry organizer! Not only will this DIY project keep your precious gems in order, but it will also add a touch of charm to your space. Dive into our ultimate guide and learn how to create a personalized jewelry organizer that suits your style while keeping your accessories neatly arranged. Let’s get crafty!
Materials and Tools Needed
To start your embroidery jewelry organizer project, you’ll need a few essential materials and tools. First, gather some fabric of your choice—consider using a sturdy canvas or linen for durability. Next, select colorful embroidery threads to add a pop of personality to your organizer.
Remember the backing material; felt provides structure and stability. You’ll also need an embroidery hoop to stretch the fabric taut while you create neat stitches. Additionally, grab some needles suitable for embroidery and scissors to cut thread and excess fabric.
Consider including decorative elements like beads or sequins in your design for added flair. Finally, have a ruler handy to ensure precise measurements as you craft your one-of-a-kind jewelry organizer masterpiece!
Step-by-Step Instructions for Creating Your Organizer
Are you ready to create your very own stylish embroidery jewelry organizer? Follow the step-by-step instructions to get started.
First, gather all the materials and tools you need for this project. You’ll want a piece of fabric, an embroidery hoop, various colors of embroidery floss, needles, scissors, and any embellishments you’d like to add.
Next, place your fabric in the embroidery hoop and secure it tightly. Then, choose a design or pattern for your organizer. It could be something simple like geometric shapes or intricate floral motifs – let your creativity shine!
Start embroidering your chosen design onto the fabric using different colored threads. Take your time with each stitch to ensure precision and neatness.
Once you’ve finished embroidering the design, trim any excess fabric around the hoop and remove it from the frame. Add any final touches or embellishments to personalize your organizer further.
Voila! You now have a beautiful handmade embroidery jewelry organizer ready to store and display all your favorite pieces. Enjoy creating!
Tips and Tricks for Personalizing Your Organizer
The possibilities are endless when it comes to personalizing your embroidery jewelry organizer. One tip is to incorporate your favoritecolors or patterns into the design. Whether you love pastels or bold hues, choose shades that reflect your style and personality.
Another trick is to add embellishments like beads, sequins, or charms to give your organizer a unique touch. These little details can make a big difference in enhancing the overall look of your creation.
You can also consider adding pockets, pouches, or compartments to cater to specific jewelry pieces such as rings, earrings, bracelets, and necklaces. This customization allows for better organization and easier access to your accessories.
Remember personalization through embroidery! You can stitch initials, symbols, or meaningful words onto the fabric of your organizer for a personalized touch that truly makes it one-of-a-kind.
Creative Ideas for Displaying and Storing Your Jewelry
Looking for creative ways to display and store your jewelry? Look no further!
One fun idea is to repurpose a vintage frame by adding hooks or knobs to hang necklaces, bracelets, and earrings. This keeps your jewelry organized and adds a charming touch to your decor.
Another option is to use a tiered dessert stand as a stylish way to showcase your favorite pieces. Place rings on the top tier, bracelets in the middle, and earrings on the bottom for easy access.
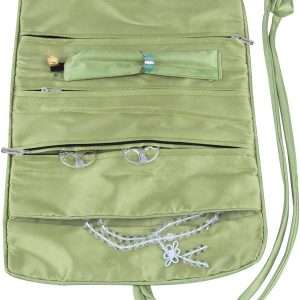
If you feel crafty, consider making a DIY hanging jewelry organizer using fabric pockets or embroidery hoops. Hang it on the wall for a functional yet decorative storage solution.
For those with limited space, try using small ceramic dishes or trays to corral rings and stud earrings on your dresser or vanity. Mixing textures and colors can add visual interest while keeping everything tidy.
Get creative with unconventional items like decorative bowls, teacups, or driftwood branches to create unique displays that reflect your style. The possibilities are endless when it comes to showcasing your jewelry imaginatively!
Benefits of Using an Embroidery Jewelry Organizer
Organizing your jewelry with an embroidery jewelry organizer adds a touch of style to your space and offers numerous benefits. By creating your stylish organizer, you can customize it to suit your taste and needs. This DIY project lets you showcase your creativity while keeping your jewelry neatly arranged and easily accessible.
With step-by-step instructions, helpful tips for personalization, and creative ideas for display, you can create a functional and decorative piece that enhances the look of your room. Whether hanging it on the wall or on a vanity table, an embroidery jewelry organizer helps prevent tangling, loss, or damage to your favorite pieces.
Incorporating this practical storage solution into your daily routine saves time searching for specific items and ensures that each piece is correctly cared for. Say goodbye to tangled necklaces, missing earrings, or scratched bracelets – with an embroidery jewelry organizer, everything has its place.
Start crafting today and enjoy the benefits of using an embroidery jewelry organizer to add organization and style to your accessory collection!