


Maximize Your Space: The Ultimate Guide to Creating a Stylish Jewelry Hanging Organizer
Are you tired of rummaging through tangled necklaces and mismatched earrings? It’s time to transform your jewelry chaos into a stylish display.
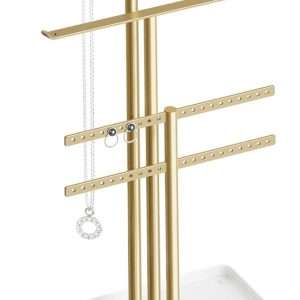
Say goodbye to cluttered drawers and tangled messes by creating your own DIY jewelry hanging organizer. Not only will it save you time and frustration, but it will also add a touch of elegance to your room. This ultimate guide will walk you through creating a functional and chic jewelry organizer that will maximize your space and keep your precious accessories in perfect order. Prepare to elevate your organization game and showcase your favorite pieces with pride! A jewelry hanging organizer not only declutters your space but also adds a touch of elegance to your decor. Imagine walking into your room and being greeted by a beautiful arrangement of your favorite pieces, all within easy reach.
Creating a DIY jewelry hanging organizer is simpler than you think. With just a few materials, some creativity, and this ultimate guide, you’ll be well on your way to maximizing style and function in any space. Whether you’re an avid collector or simply looking for ways to streamline everyday accessories, let’s dive into the benefits of organizing your treasures effectively!
Benefits of using a jewelry hanging organizer
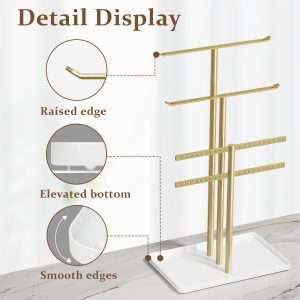
A jewelry hanging organizer is more than just a storage solution. It elevates your space and showcases your collection beautifully.
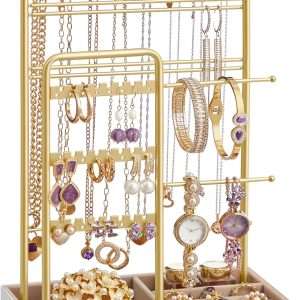
First, it saves time—there is no more digging through boxes or drawers to find that perfect pair of earrings. Everything is visible at a glance.
Additionally, these organizers prevent damage. Hanging necklaces reduces tangling and minimizes breakage. This means longer-lasting pieces you can enjoy for years.
They also add a decorative touch to any room. Choose an eye-catching design that complements your decor style, turning functional storage into art.
Using one encourages mindfulness in accessorizing. With everything displayed prominently, you’re reminded of what you own and inspired to mix and match in new ways each day.
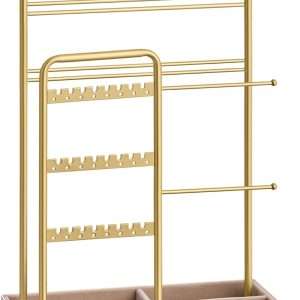
Materials and tools needed for a DIY jewelry hanging organizer
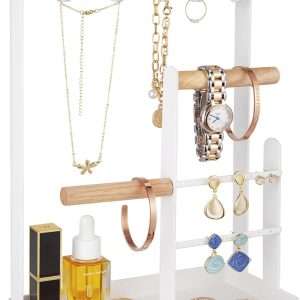
Creating your jewelry hanging organizer is both fun and rewarding. Start with the basics: a sturdy wooden board or an old picture frame works wonders as the base.
You’ll also need hooks, which can be found in various styles to match your decor. If you prefer a no-drill option, look for adhesive hooks or screw-in types for extra durability.
Remember to add some beautiful fabric or decorative paper. This will add personality while covering up any unattractive elements of your organizer.
A hot glue gun is essential for securing items in place, along with scissors for precise cuts. If you’d like to customize the color scheme further, you might want to grab some paint or wood stain.
Consider adding small containers or jars to neatly store smaller pieces like rings and earrings. These materials will help transform a simple idea into a stylish display that showcases your collection beautifully.
Creative ways to personalize and decorate your organizer
When personalizing your jewelry hanging organizer, the sky’s the limit. You can transform a simple storage solution into a stunning decor that reflects your style and personality.
Start by choosing colors that resonate with you. Paint or stain wooden organizers in shades that complement your room’s palette. If you prefer metallics, consider spray painting parts of your organizer for a chic finish.
Adding embellishments is another fantastic way to make it yours. Think about incorporating decorative knobs or handles for an eye-catching touch. You might even attach small mirrors or use washi tape in fun patterns along the edges.
Don’t shy away from fabric, either! Drape some colorful lace, burlap, or velvet at certain spots on the organizer to create texture and depth. These fabrics can serve both aesthetic purposes and act as soft padding for delicate pieces.
If you’re feeling crafty, try using old picture frames as backdrops for displaying earrings or necklaces. Just remove the glass and add wire across the frame; hang your items onto it—a unique twist sure to catch your attention.
Ensure every piece has its designated spot, but also allow flexibility when needed—this makes rearranging easy if you want a fresh look later!
By blending functionality with creativity, you can create a stylish, practical, and truly unique jewelry hanging organizer.